SQL CE – What is it and why should you care?
SQL CE is a free, embedded, database engine that enables easy database storage.No Database Installation Required
SQL CE does not require you to run a setup or install a database server in order to use it. You can simply copy the SQL CE binaries into the \bin directory of your ASP.NET application, and then your web application can use it as a database engine. No setup or extra security permissions are required for it to run. You do not need to have an administrator account on the machine. Just copy your web application onto any server and it will work. This is true even of medium-trust applications running in a web hosting environment.
SQL CE runs in-memory within your ASP.NET application and will start-up when you first access a SQL CE database, and will automatically shutdown when your application is unloaded. SQL CE databases are stored as files that live within the \App_Data folder of your ASP.NET Applications.
Works with Existing Data APIs
SQL CE 4 works with existing .NET-based data APIs, and supports a SQL Server compatible query syntax. This means you can use existing data APIs like ADO.NET, as well as use higher-level ORMs like Entity Framework and NHibernate with SQL CE. This enables you to use the same data programming skills and data APIs you know today.
Supports Development, Testing and Production Scenarios
SQL CE can be used for development scenarios, testing scenarios, and light production usage scenarios. With the SQL CE 4 release we’ve done the engineering work to ensure that SQL CE won’t crash or deadlock when used in a multi-threaded server scenario (like ASP.NET). This is a big change from previous releases of SQL CE – which were designed for client-only scenarios and which explicitly blocked running in web-server environments. Starting with SQL CE 4 you can use it in a web-server as well.
There are no license restrictions with SQL CE. It is also totally free.
Easy Migration to SQL Server
SQL CE is an embedded database – which makes it ideal for development, testing, and light-usage scenarios. For high-volume sites and applications you’ll probably want to migrate your database to use SQL Server Express (which is free), SQL Server or SQL Azure. These servers enable much better scalability, more development features (including features like Stored Procedures – which aren’t supported with SQL CE), as well as more advanced data management capabilities.
We’ll ship migration tools that enable you to optionally take SQL CE databases and easily upgrade them to use SQL Server Express, SQL Server, or SQL Azure. You will not need to change your code when upgrading a SQL CE database to SQL Server or SQL Azure. Our goal is to enable you to be able to simply change the database connection string in your web.config file and have your application just work.
New Tooling Support for SQL CE in VS 2010 SP1
VS 2010 SP1 includes much improved tooling support for SQL CE, and adds support for using SQL CE within ASP.NET projects for the first time. With VS 2010 SP1 you can now:- Create new SQL CE Databases
- Edit and Modify SQL CE Database Schema and Indexes
- Populate SQL CE Databases within Data
- Use the Entity Framework (EF) designer to create model layers against SQL CE databases
- Use EF Code First to define model layers in code, then create a SQL CE database from them, and optionally edit the DB with VS
- Deploy SQL CE databases to remote servers using Web Deploy and optionally convert them to full SQL Server databases
Download
You can enable SQL CE tooling support within VS 2010 by first installing VS 2010 SP1 (beta).Once SP1 is installed, you’ll also then need to install the SQL CE Tools for Visual Studio download. This is a separate download that enables the SQL CE tooling support for VS 2010 SP1.
Walkthrough of Two Scenarios
In this blog post I’m going to walkthrough how you can take advantage of SQL CE and VS 2010 SP1 using both an ASP.NET Web Forms and an ASP.NET MVC based application. Specifically, we’ll walkthrough:- How to create a SQL CE database using VS 2010 SP1, then use the EF4 visual designers in Visual Studio to construct a model layer from it, and then display and edit the data using an ASP.NET GridView control.
- How to use an EF Code First approach to define a model layer using POCO classes and then have EF Code-First “auto-create” a SQL CE database for us based on our model classes. We’ll then look at how we can use the new VS 2010 SP1 support for SQL CE to inspect the database that was created, populate it with data, and later make schema changes to it. We’ll do all this within the context of an ASP.NET MVC based application.
Walkthrough 1: Create a SQL CE Database, Create EF Model Classes, Edit the Data with a GridView
This first walkthrough will demonstrate how to create and define a SQL CE database within an ASP.NET Web Form application. We’ll then build an EF model layer for it and use that model layer to enable data editing scenarios with an <asp:GridView> control.Step 1: Create a new ASP.NET Web Forms Project
We’ll begin by using the File->New Project menu command within Visual Studio to create a new ASP.NET Web Forms project. We’ll use the “ASP.NET Web Application” project template option so that it has a default UI skin implemented:

Step 2: Create a SQL CE Database
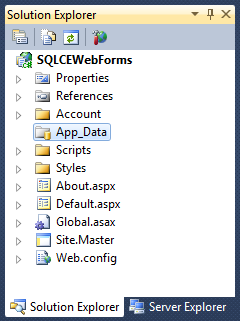
Right click on the “App_Data” folder within the created project and choose the “Add->New Item” menu command:
This will bring up the “Add Item” dialog box. Select the “SQL Server Compact 4.0 Local Database” item (new in VS 2010 SP1) and name the database file to create “Store.sdf”:
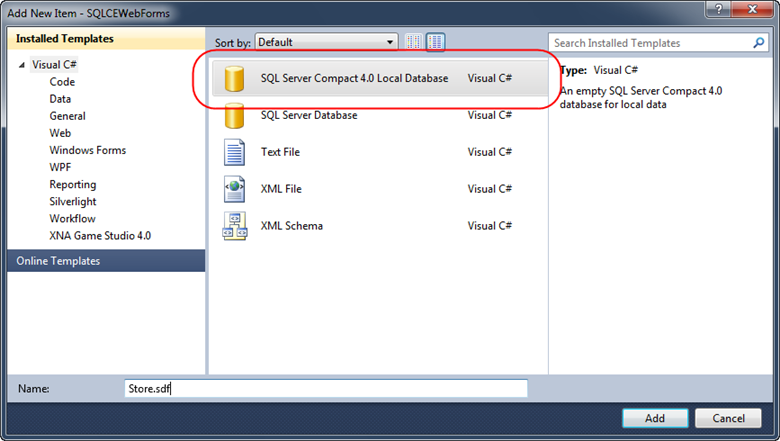
Note that SQL CE database files have a .sdf filename extension. Place them within the /App_Data folder of your ASP.NET application to enable easy deployment.
When we clicked the “Add” button above a Store.sdf file was added to our project:

Step 3: Adding a “Products” Table
Double-clicking the “Store.sdf” database file will open it up within the Server Explorer tab. Since it is a new database there are no tables within it:

Right click on the “Tables” icon and choose the “Create Table” menu command to create a new database table. We’ll name the new table “Products” and add 4 columns to it. We’ll mark the first column as a primary key (and make it an identify column so that its value will automatically increment with each new row):

When we click “ok” our new Products table will be created in the SQL CE database.
Step 4: Populate with Data
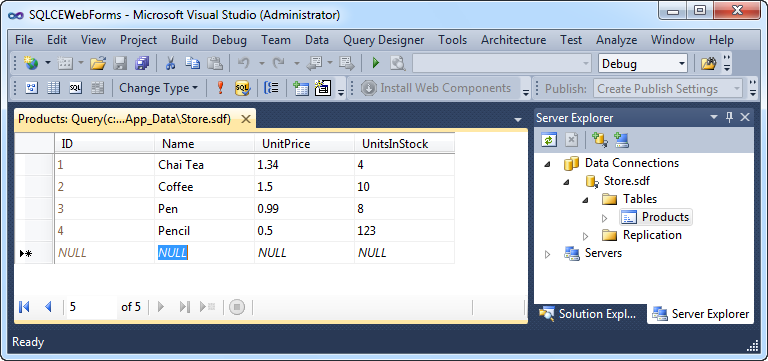
Once our Products table is created it will show up within the Server Explorer. We can right-click it and choose the “Show Table Data” menu command to edit its data:

Let’s add a few sample rows of data to it:
Step 5: Create an EF Model Layer
We have a SQL CE database with some data in it – let’s now create an EF Model Layer that will provide a way for us to easily query and update data within it.
Let’s right-click on our project and choose the “Add->New Item” menu command. This will bring up the “Add New Item” dialog – select the “ADO.NET Entity Data Model” item within it and name it “Store.edmx”

This will add a new Store.edmx item to our solution explorer and launch a wizard that allows us to quickly create an EF model:

Select the “Generate From Database” option above and click next. Choose to use the Store.sdf SQL CE database we just created and then click next again.
The wizard will then ask you what database objects you want to import into your model. Let’s choose to import the “Products” table we created earlier:

When we click the “Finish” button Visual Studio will open up the EF designer. It will have a Product entity already on it that maps to the “Products” table within our SQL CE database:

The VS 2010 SP1 EF designer works exactly the same with SQL CE as it does already with SQL Server and SQL Express. The Product entity above will be persisted as a class (called “Product”) that we can programmatically work against within our ASP.NET application.
Step 6: Compile the Project
Before using your model layer you’ll need to build your project. Do a Ctrl+Shift+B to compile the project, or use the Build->Build Solution menu command.
Step 7: Create a Page that Uses our EF Model Layer
Let’s now create a simple ASP.NET Web Form that contains a GridView control that we can use to display and edit the our Products data (via the EF Model Layer we just created).
Right-click on the project and choose the Add->New Item command. Select the “Web Form from Master Page” item template, and name the page you create “Products.aspx”. Base the master page on the “Site.Master” template that is in the root of the project.
Add an <h2>Products</h2> heading the new Page, and add an <asp:gridview> control within it:

Then click the “Design” tab to switch into design-view. Select the GridView control, and then click the top-right corner to display the GridView’s “Smart Tasks” UI:

Choose the “New data source…” drop down option above. This will bring up the below dialog which allows you to pick your Data Source type:

Select the “Entity” data source option – which will allow us to easily connect our GridView to the EF model layer we created earlier. This will bring up another dialog that allows us to pick our model layer:

Select the “StoreEntities” option in the dropdown – which is the EF model layer we created earlier. Then click next – which will allow us to pick which entity within it we want to bind to:

Select the “Products” entity in the above dialog – which indicates that we want to bind against the “Product” entity class we defined earlier. Then click the “Enable automatic updates” checkbox to ensure that we can both query and update Products. When you click “Finish” VS will wire-up an <asp:EntityDataSource> to your <asp:GridView> control:

The last two steps we’ll do will be to click the “Enable Editing” checkbox on the Grid (which will cause the Grid to display an “Edit” link on each row) and (optionally) use the Auto Format dialog to pick a UI template for the Grid.
Step 8: Run the Application
Let’s now run our application and browse to the /Products.aspx page that contains our GridView. When we do so we’ll see a Grid UI of the Products within our SQL CE database. Clicking the “Edit” link for any of the rows will allow us to edit their values:
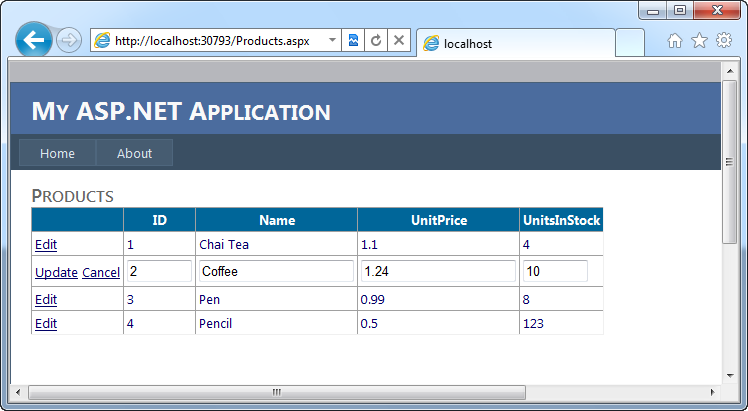
When we click “Update” the GridView will post back the values, persist them through our EF Model Layer, and ultimately save them within our SQL CE database.
Learn More about using EF with ASP.NET Web Forms
Read this tutorial series on the http://asp.net site to learn more about how to use EF with ASP.NET Web Forms.
The tutorial series uses SQL Express as the database – but the nice thing is that all of the same steps/concepts can also now also be done with SQL CE.
Walkthrough 2: Using EF Code-First with SQL CE and ASP.NET MVC 3
We used a database-first approach with the sample above – where we first created the database, and then used the EF designer to create model classes from the database.In addition to supporting a designer-based development workflow, EF also enables a more code-centric option which we call “code first development”. Code-First Development enables a pretty sweet development workflow. It enables you to:
- Define your model objects by simply writing “plain old classes” with no base classes or visual designer required
- Use a “convention over configuration” approach that enables database persistence without explicitly configuring anything
- Optionally override the convention-based persistence and use a fluent code API to fully customize the persistence mapping
- Optionally auto-create a database based on the model classes you define – allowing you to start from code first
The combination of SQL CE, EF Code First, and the new VS tooling support for SQL CE, enables a pretty nice workflow. Below is a simple example of how you can use them to build a simple ASP.NET MVC 3 application.
Step 1: Create a new ASP.NET MVC 3 Project
We’ll begin by using the File->New Project menu command within Visual Studio to create a new ASP.NET MVC 3 project. We’ll use the “Internet Project” template so that it has a default UI skin implemented:

Step 2: Use NuGet to Install EFCodeFirst
Next we’ll use the NuGet package manager (automatically installed by ASP.NET MVC 3) to add the EFCodeFirst library to our project. We’ll use the Package Manager command shell to do this. Bring up the package manager console within Visual Studio by selecting the View->Other Windows->Package Manager Console menu command. Then type:
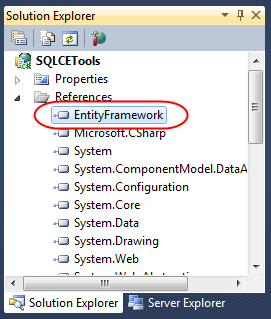
install-package EFCodeFirstwithin the package manager console to download the EFCodeFirst library and have it be added to our project:

When we enter the above command, the EFCodeFirst library will be downloaded and added to our application:
Step 3: Build Some Model Classes
Using a “code first” based development workflow, we will create our model classes first (even before we have a database). We create these model classes by writing code.
For this sample, we will right click on the “Models” folder of our project and add the below three classes to our project:

The “Dinner” and “RSVP” model classes above are “plain old CLR objects” (aka POCO). They do not need to derive from any base classes or implement any interfaces, and the properties they expose are standard .NET data-types. No data persistence attributes or data code has been added to them.
The “NerdDinners” class derives from the DbContext class (which is supplied by EFCodeFirst) and handles the retrieval/persistence of our Dinner and RSVP instances from a database.
Step 4: Listing Dinners
We’ve written all of the code necessary to implement our model layer for this simple project.
Let’s now expose and implement the URL: /Dinners/Upcoming within our project. We’ll use it to list upcoming dinners that happen in the future.
We’ll do this by right-clicking on our “Controllers” folder and select the “Add->Controller” menu command. We’ll name the Controller we want to create “DinnersController”. We’ll then implement an “Upcoming” action method within it that lists upcoming dinners using our model layer above. We will use a LINQ query to retrieve the data and pass it to a View to render with the code below:

We’ll then right-click within our Upcoming method and choose the “Add-View” menu command to create an “Upcoming” view template that displays our dinners. We’ll use the “empty” template option within the “Add View” dialog and write the below view template using Razor:

Step 4: Configure our Project to use a SQL CE Database
We have finished writing all of our code – our last step will be to configure a database connection-string to use.
We will point our NerdDinners model class to a SQL CE database by adding the below <connectionString> to the web.config file at the top of our project:

EF Code First uses a default convention where context classes will look for a connection-string that matches the DbContext class name. Because we created a “NerdDinners” class earlier, we’ve also named our connectionstring “NerdDinners”. Above we are configuring our connection-string to use SQL CE as the database, and telling it that our SQL CE database file will live within the \App_Data directory of our ASP.NET project.
Step 5: Running our Application
Now that we’ve built our application, let’s run it!
We’ll browse to the /Dinners/Upcoming URL – doing so will display an empty list of upcoming dinners:

You might ask – but where did it query to get the dinners from? We didn’t explicitly create a database?!?
One of the cool features that EF Code-First supports is the ability to automatically create a database (based on the schema of our model classes) when the database we point it at doesn’t exist. Above we configured EF Code-First to point at a SQL CE database in the \App_Data\ directory of our project. When we ran our application, EF Code-First saw that the SQL CE database didn’t exist and automatically created it for us.
Step 6: Using VS 2010 SP1 to Explore our newly created SQL CE Database
Click the “Show all Files” icon within the Solution Explorer and you’ll see the “NerdDinners.sdf” SQL CE database file that was automatically created for us by EF code-first within the \App_Data\ folder:

We can optionally right-click on the file and “Include in Project" to add it to our solution:

We can also double-click the file (regardless of whether it is added to the project) and VS 2010 SP1 will open it as a database we can edit within the “Server Explorer” tab of the IDE.
Below is the view we get when we double-click our NerdDinners.sdf SQL CE file. We can drill in to see the schema of the Dinners and RSVPs tables in the tree explorer.
Notice how two tables - Dinners and RSVPs – were automatically created for us within our SQL CE database. This was done by EF Code First when we accessed the NerdDinners class by running our application above:

We can right-click on a Table and use the “Show Table Data” command to enter some upcoming dinners in our database:

We’ll use the built-in editor that VS 2010 SP1 supports to populate our table data below:

And now when we hit “refresh” on the /Dinners/Upcoming URL within our browser we’ll see some upcoming dinners show up:

Step 7: Changing our Model and Database Schema
Let’s now modify the schema of our model layer and database, and walkthrough one way that the new VS 2010 SP1 Tooling support for SQL CE can make this easier.
With EF Code-First you typically start making database changes by modifying the model classes. For example, let’s add an additional string property called “UrlLink” to our “Dinner” class. We’ll use this to point to a link for more information about the event:

Now when we re-run our project, and visit the /Dinners/Upcoming URL we’ll see an error thrown:

We are seeing this error because EF Code-First automatically created our database, and by default when it does this it adds a table that helps tracks whether the schema of our database is in sync with our model classes. EF Code-First helpfully throws an error when they become out of sync – making it easier to track down issues at development time that you might otherwise only find (via obscure errors) at runtime. Note that if you do not want this feature you can turn it off by changing the default conventions of your DbContext class (in this case our NerdDinners class) to not track the schema version.
Our model classes and database schema are out of sync in the above example – so how do we fix this? There are two approaches you can use today:
- Delete the database and have EF Code First automatically re-create the database based on the new model class schema (losing the data within the existing DB)
- Modify the schema of the existing database to make it in sync with the model classes (keeping/migrating the data within the existing DB)
Step 8: Modify our SQL CE Database Schema using VS 2010 SP1
The new SQL CE Tooling support within VS 2010 SP1 makes it easy to modify the schema of our existing SQL CE database. To do this we’ll right-click on our “Dinners” table and choose the “Edit Table Schema” command:

This will bring up the below “Edit Table” dialog. We can rename, change or delete any of the existing columns in our table, or click at the bottom of the column listing and type to add a new column. Below I’ve added a new “UrlLink” column of type “nvarchar” (since our property is a string):

When we click ok our database will be updated to have the new column and our schema will now match our model classes.
Because we are manually modifying our database schema, there is one additional step we need to take to let EF Code-First know that the database schema is in sync with our model classes. As i mentioned earlier, when a database is automatically created by EF Code-First it adds a “EdmMetadata” table to the database to track schema versions (and hash our model classes against them to detect mismatches between our model classes and the database schema):

Since we are manually updating and maintaining our database schema, we don’t need this table – and can just delete it:

This will leave us with just the two tables that correspond to our model classes:
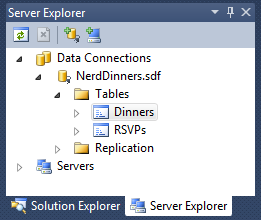
And now when we re-run our /Dinners/Upcoming URL it will display the dinners correctly:

One last touch we could do would be to update our view to check for the new UrlLink property and render a <a> link to it if an event has one:

And now when we refresh our /Dinners/Upcoming we will see hyperlinks for the events that have a UrlLink stored in the database:

Summary
SQL CE provides a free, embedded, database engine that you can use to easily enable database storage. With SQL CE 4 you can now take advantage of it within ASP.NET projects and applications (both Web Forms and MVC).VS 2010 SP1 provides tooling support that enables you to easily create, edit and modify SQL CE databases – as well as use the standard EF designer against them. This allows you to re-use your existing skills and data knowledge while taking advantage of an embedded database option. This is useful both for small applications (where you don’t need the scalability of a full SQL Server), as well as for development and testing scenarios – where you want to be able to rapidly develop/test your application without having a full database instance.
SQL CE makes it easy to later migrate your data to a full SQL Server or SQL Azure instance if you want to – without having to change any code in your application. All we would need to change in the above two scenarios is the <connectionString> value within the web.config file in order to have our code run against a full SQL Server. This provides the flexibility to scale up your application starting from a small embedded database solution as needed.
Hope this helps,
Shibashish mohanty,Software engg.,bbsr


No comments:
Post a Comment
Please don't spam, spam comments is not allowed here.